This article delivers an agent-based model in Python for ABM simulations. In a previous post I demonstrated how to visualize a 2D grid, using matplotlib and pyplot in Python (post titled “Visualizing 2D grids and arrays using matplotlib in Python”). That post was meant as first introduction on how to visualize grids in Python. Visualizing grids can be of interest when e.g. visualizing results from agent-based simulation studies.
In this post I model the foundations of a simple agent-based simulation model, using a 2D array as an environment which can be populated by two types of agents.
This 2D array will serve as a battlefield on which two groups of agents will fight a battle.
Agents have the same set of attributes, one of them being their group membership. Besides from this they all have a life score, which is equal when simulation starts. Lastly, they have set of coordinates (x and y coordinates), representing their spatial location in a 2-dimensional world.
I will not perform a simulation study in this post. This will be done in an upcoming post. I will use the model from this post in future post to simulate a battle between the two groups of agents.
Setting up classes for agent-based model in Python
In the code snippet below I define a class for agents, containing relevant attributes and methods. Documentation is added to the code in the form of comments.
# class, defining agents as abstract data types
class agent:
    # init-method, the constructor method for agents
    def __init__(self,x,y,group):
        self.life = 100.0 # agent's life score
        self.x = x
        self.y = y
        self.group = group
Next step is to define a 2D grid array, in the form of a 2D list.
Interaction space for agents in agent-based model in Python
Rows represent x-coordinates while columns represent y-coordinates. This 2D list represents the battlefield. I define it to have a size of 100 x 100 cells, i.e. 10,000 locations. I will use default list type in Python to define this “battlefield” array. The way to go is to use list comprehensions in Python:
# creating empty 100 x 100 list using list comprehension in python
battlefield = [[None for i in range(0,100)] for i in range(0,100)]
Next, I will create two groups of agents and locate them at random locations within the battlefield. In separate lists I furthermore store references to the agent objects.
Populating simple simulation model with agents
I will create 1000 agents of group A, and 1000 agents of group B.
# list with available x and y locations
locations = battlefield.copy() # using .copy prevents copying by reference
# create empty list for containing agent references in future, type A & B
agents_A = []
agents_B = []
# assigning random spots to agents of group A and B;
# -- for this I will need the random module, so import it
import random
# -- define a function for creating agents and assigning them to grid
def agentCreator(size,group,groupList,field,n,m):
    # loop through entire group, i.e. in this case 1000 units
    for j in range(0,size):
        # select random available location
        while True:
            # random x coordinate
            x = random.choice(range(0,n))
            # random y coordinate
            y = random.choice(range(0,m))
            # check if spot is available; if not then re-iterate
            if field[x][y] == None:
                field[x][y] = agent(x=x,y=y,group=group)
                # append agent object reference to group list
                groupList.append(field[x][y])
                # exit while loop; spot on field is taken
                break
# -- I populate the battlefield using the agentCreator function
agentCreator(size = 1000,
                group = "A",
                groupList = agents_A,
                field = battlefield,
                n = 100,
                m = 100)
 agentCreator(size = 1000,
                group = "B",
                groupList = agents_B,
                field = battlefield,
                n = 100,
                m = 100)
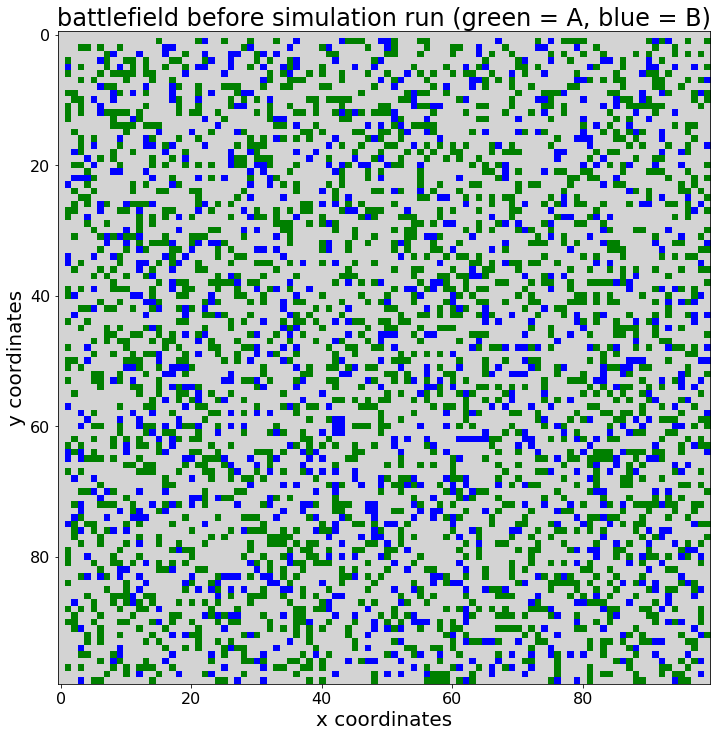
The 2D list “battlefield” now contains either an agent reference or nothing (None). Any agent is furthermore either of type A or B. Finally, all agents have a life score of 100. This is the initial setting, i.e. the setting while the battle has not started yet.
Visualizing agent-based simulation model in Python
To complete this first post on agent-based simulation I will visualize the location of type A agents and the location of type B agents, in two separate grid plots. The key to doing this is to use matplotlib.pyplot, with the method .imshow():
# .imshow() needs a matrix with float elements;
population = [[0.0 for i in range(0,100)] for i in range(0,100)]
# if agent is of type A, put a 1.0, if of type B, pyt a 2.0
for i in range(1,100):
    for j in range(1,100):
        if battlefield[i][j] == None: # empty
            pass # leave 0.0 in population cell
        elif battlefield[i][j].group == "A": # group A agents
            population[i][j] = 1.0 # 1.0 means "A"
        else: # group B agents
            population[i][j] = 2.0 # 2.0 means "B"
# import pyplot and colors from matplotlib
from matplotlib import pyplot, colors
# using colors from matplotlib, define a color map
colormap = colors.ListedColormap(["lightgrey","green","blue"])
# define figure size using pyplot
pyplot.figure(figsize = (12,12))
# using pyplot add a title
pyplot.title("battlefield before simulation run (green = A, blue = B)",
            fontsize = 24)
# using pyplot add x and y labels
pyplot.xlabel("x coordinates", fontsize = 20)
pyplot.ylabel("y coordinates", fontsize = 20)
# adjust x and y axis ticks, using pyplot
pyplot.xticks(fontsize = 16)
pyplot.yticks(fontsize = 16)
# use .imshow() method from pyplot to visualize agent locations
pyplot.imshow(X = population,
             cmap = colormap)
<matplotlib.image.AxesImage at 0x1c756b04c88>

In an upcoming post I will use the basic model developed in this post to simulate the actual battle between the two groups of agents. I will look at different parameters and how they influence the outcome of the battle. This will be my starting point for teaching more about agent-based simulation in Python.
References to related content
Developing an agent-based model in Python allows for agent-based simulation. This method is especially useful for answering strategic research questions. I have published a rather elaborate explanation of this in the following article:
In addition, I recommend the following articles to anyone interested in agent-based modeling and agent-based simulation:
- Link: Visualizing an agent-based simulation run with Matplotlib
- Link: Visualizing 2d grids and arrays using Matplotlib
- Link: Agent-based modeling in Python

Data scientist focusing on simulation, optimization and modeling in R, SQL, VBA and Python


Leave a Reply